In ArcGIS Pro, you can use raster functions to create custom image processing tools, called raster function templates. The following steps outline how to find and apply a custom raster function template in the Enterprise portal.
Add a custom raster function template to your organization
All raster function templates must be uploaded to your organization before they can be applied to a dataset in Enterprise portal. From your organization's ArcGIS Enterprise landing page, you can add a raster function template from the Content page, or you can add the template from ArcGIS Pro.
- Go to your organization’s Content page and select Add Item > From my computer.
- In the dialog box that appears, browse to the raster function template that you want to add, and click Add Item.
Add custom raster functions from ArcGIS Pro
Complete the following steps to add custom raster functions from ArcGIS Pro:
- Open the Raster Functions pane from the Imagery tab and navigate to the Custom category.
- Right-click on a raster function template and select Share to Portal.
- Provide a summary description and tags for the function template.
- Under Sharing Options, use the check boxes to select the members of your organization that you want to share the raster function template with.
Select a raster function template in Enterprise portal
Once you have raster function templates added to your organization, you can work with them from Enterprise portal. First, you need to add any data that you want to process to the map viewer. Some raster function templates use multiple inputs. If you are using a template with multiple inputs, add all of them to the map viewer.
Note:
If you do not see the Analysis button or the Raster Analysis tab in the map viewer, contact your portal administrator. Your portal may not be configured with ArcGIS Image Server, or you may not have privileges to run the tools. If you do not have the permissions required for the tools, they will not be visible.
You must have the following privileges to run analysis tools, including custom tools:
- Create, update, and delete content
- Publish hosted feature layers
- Raster analysis
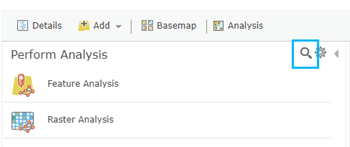
- From the map view, click the Analysis button to open the Perform Analysis pane.
On the Perform Analysis pane, two choices are presented for the type of analysis to perform, Feature Analysis and Raster Analysis. These two categories contain standard system tools for processing your feature data and imagery. Note that raster function templates are designed to work with imagery and will not process feature data.
- Click the Search button to browse to your raster function templates.

This opens the dialog box where you can search for the raster function templates that were added to your organization.
- Select the raster function template that you want to apply to the imagery that you have added to your map in the viewer.
Once selected, the description of the raster function template appears, along with a Select Template button.
- Click Select Template.
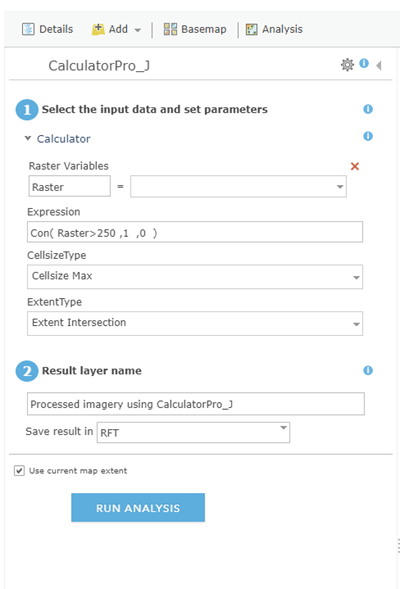
The Analysis pane shows the user interface for the raster function template. Under Select the input data and set parameters, the template is organized based on the component function followed by its parameters. In the example below, Calculator is the only function in this template. This section is collapsible and contains inputs for raster variables, the expression, cell size, and extent type.

- Under Result layer name, give the output layer a name and designate the folder where you want it saved.
The last option in the raster function parameter pane is Use current map extent. Check this box to process only the portion of your imagery visible in your map view. Uncheck this box and the entire image will be processed.
Enterprise portal supports working with raster function templates to perform distributed image processing in raster analysis system deployments. The raster function templates are created in ArcGIS Pro and uploaded and shared with your Enterprise portal members. These capabilities allow you to search, upload and apply raster function templates to imagery in your map viewer.